DSAR-Acknowledge
In this stage, the email template chosen for communicating with the customer can be configured based on the user's answers/responses in the privacy portal when submitting the request.
Click the 'Next' button on the 'In Process' configuration to reach the 'Acknowledge' configuration page.
Another way to reach this page is by clicking the 'Acknowledge' option on the Flow Screen.

The screen shows different templates configured for each stage of processing the service request placed by the user.
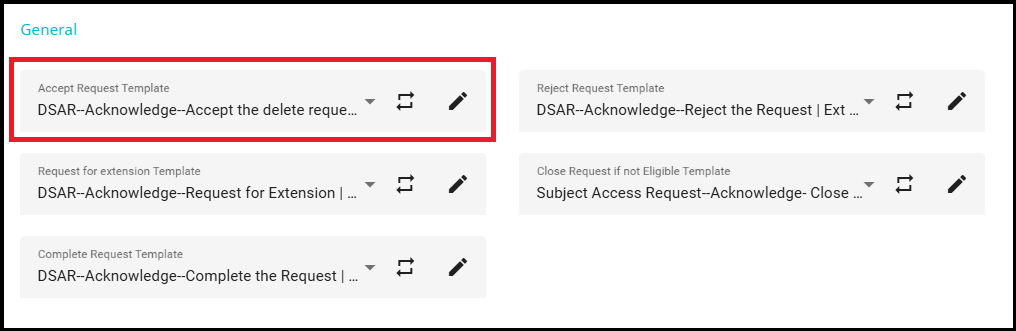
General Templates
General Templates are a set of standard email templates used for communicating with users during various stages of processing a DSAR (Data Subject Access Request). These templates cover common situations such as when a request is accepted, rejected, requires an extension, is closed due to ineligibility, or is completed. By using General Templates, we ensure consistent and clear communication with users at every stage of the request lifecycle.
- Accept Request Template
The Accept Request Template is an email template used to notify the user when their request has been validated successfully. When the validation process is complete and the request is accepted, this email is sent to the requester, confirming that their request has been approved and will proceed to the next stage.
You can select the Accept Request Template from the dropdown menu in the configuration screen.
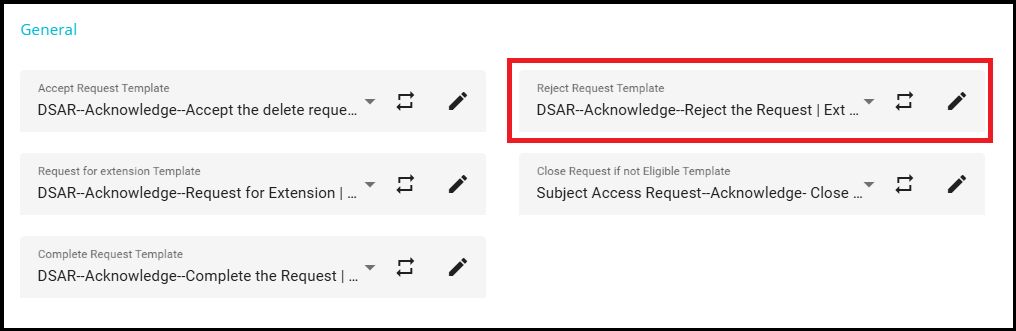
- Reject Request Template
The Reject Request Template is an email template used to notify the user when their request has been rejected. When the validation process determines that the request cannot be accepted, this email is sent to the requester, informing them that their request has been declined.
You can select the Reject Request Template from the dropdown menu in the configuration screen.
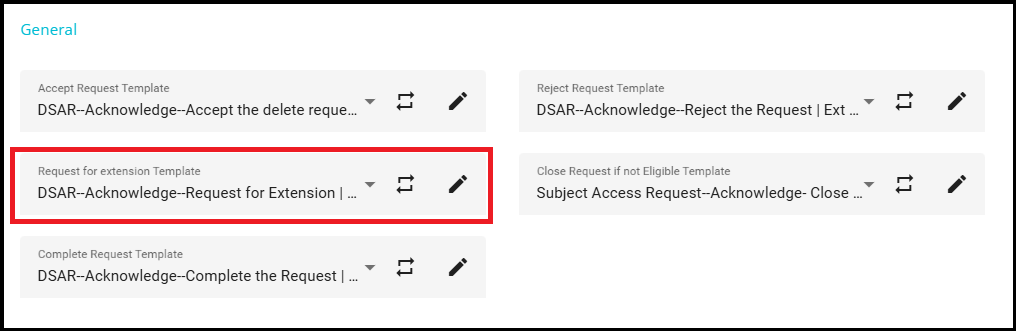
- Request for Extension Template
The Request for Extension template is an email template used to notify the user when an extension is needed to complete the processing of their request. When the user's responses match the conditions set for this template, the system selects the Request for Extension template and sends it to the user, asking for additional time to process their service request.
You can select the Request for Extension template from the dropdown menu in the configuration screen.
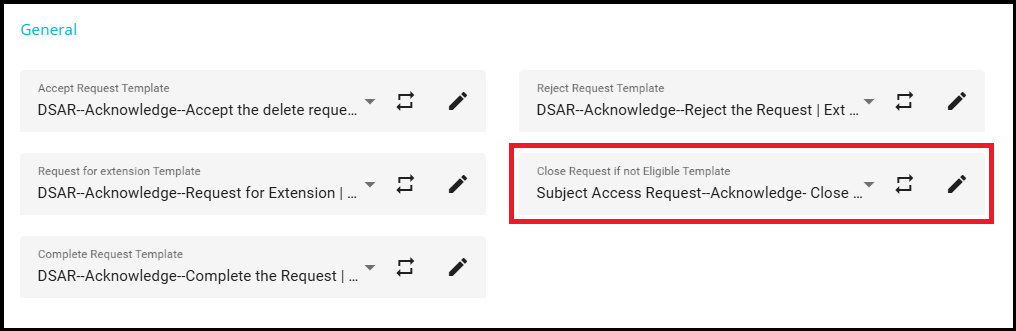
- Close Request if not Eligible
The Close Request if not Eligible template is an email template used to inform the user that their request has been closed because it is considered ineligible. When a request does not meet the eligibility criteria, this email is sent to the requester, notifying them about the closure and the reason for it.
In the configuration screen, you can select this template from the dropdown menu.
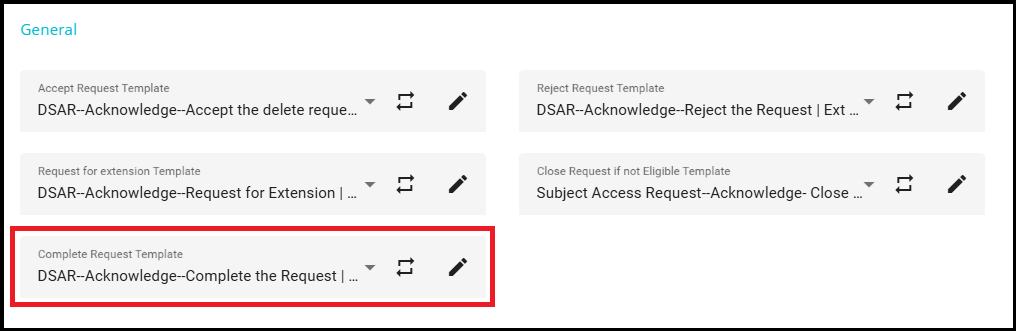
- Complete Request Template
The Complete Request Template is an email template used to inform the user that their request has been fully processed and completed. When the request reaches its final stage and all necessary actions have been taken, this email is sent to the requester to notify them of the successful completion.
You can select the Complete Request Template from the dropdown menu in the configuration screen.
Verification Stage
Verification templates are email templates used during the verification phase of a DSAR. The purpose of these templates is to communicate with users when additional verification is required before processing their request. This ensures that only valid and authorized requests are processed, maintaining data security and compliance.
- Verification Template
The Verification Template is used to send an email to the requester, asking for verification to proceed with their request.
For example, if the system needs to confirm the identity of the requester or validate certain information, this template is selected and sent. The content of this template can be customized to specify what information or action is required from the user to complete the verification process.
- Close Request Template
The Close Request Template is used when a requester does not provide the necessary verification or fails to verify the request within a specified timeframe. This template is used to notify the user that their request has been closed due to unsuccessful verification. This ensures clear communication and closure of unverified requests.
You can select the template that should be sent to the user when the request is closed from the dropdown menu in the configuration screen.

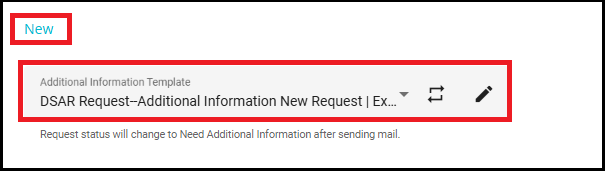
New Stage
The New stage in the DSAR workflow is a phase where you can add conditions or rule sets to determine when additional information should be requested from the user for unverified or new requests.
- Additional Information Template
You select an Additional Information Template from the dropdown menu, which determines the content of the email sent to the requester.
Once this email is sent, the status of the request will change to Need Additional Information. This ensures that the requester is promptly informed about the need for further details, and the workflow is updated to reflect that additional information is required before proceeding.
Need Additional Information Stage
The Need Additional Information stage is a phase in the DSAR workflow where you can set parameters such as the number of days after which the reminder email should be rolled out, the frequency of reminder emails, and the timeframe for closing the request if the required information is not provided.
- Close Request Template
If the requester does not submit the required additional information within the specified timeframe, the Close Request template will be sent to notify them that their request has been closed.
In the configuration screen, you can select the Close Request Template from the dropdown menu.

In Validation Stage
The Validation stage is a critical phase in the DSAR workflow where the information provided by the requester is carefully reviewed and validated. During this stage, validation strategies or rule sets are applied to determine whether the details submitted match the expected criteria. If the validation is successful (i.e., the information matches the configured strategies), the request is moved forward for processing. If there is a mismatch or missing information, additional details may be sought from the requester before proceeding.
- Accept Request Template
If the validation is successful and all criteria are met, the Accept Request Template is used. This email template is sent to the requester, confirming that their request has been validated and accepted, and will proceed to the next stage of processing.
The request status is changed to "In Process" after this email is sent.
- Additional Information Template
If there is a mismatch in the information provided by the requester, the Additional Information Template is used. This email template is sent to the requester, asking for further details or clarification needed to validate the request. The request status is changed to "Need Additional Information" after this email is sent.

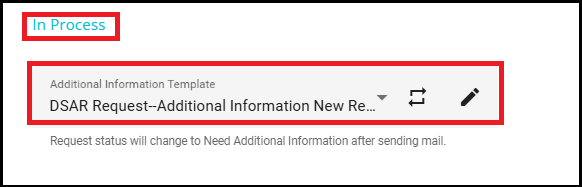
Process Stage
In the In Process stage of the DSAR workflow, the information provided in the request is actively processed. Action items that were considered as "match found" during the validation stage are carried forward to this phase. In this stage, you can add conditions that must be met to complete the request. If the criteria for these action items are met, the request is marked as completed.
- Additional Information Template
The Additional Information Template will be sent to the requester if the criteria for action items in the In Process stage are not met. This template is used to request more details from the requester.
In the configuration screen, you can select the Additional Information Template from the dropdown menu.
Note: The request status is changed to 'Need Additional Information' after an email is sent to the requester based on the new template.
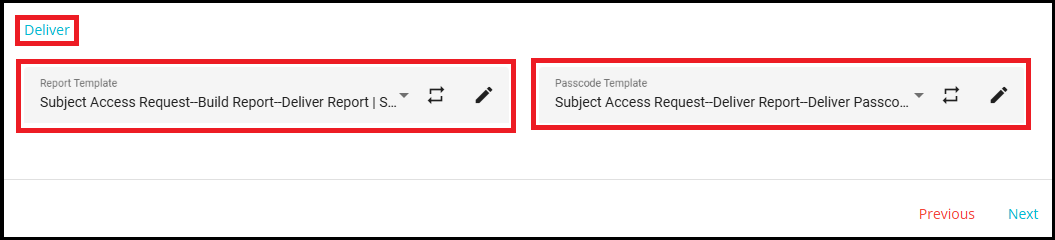
Deliver Stage
The Deliver stage in the DSAR workflow is only applicable for Copy and Summary request types. In this stage, the report generated for the request is delivered to the requester. To deliver the report securely, two templates are used:
- Report Template
The report is sent to the requester using this template. The report is delivered in an encrypted format to ensure data security.
- Passcode Template
The password required to decrypt the report (which was sent using the Report Template) is sent to the requester using this template. This ensures that only the intended recipient can access the report's content.
Automation is not implemented for the Build and Deliver phases.
The report is generated in the Build phase, then zipped in the Deliver phase.
In the Deliver stage, Report and Passcode emails are approved and sent manually by the operator using the configured templates (not sent automatically by the system).
The final report requires a manual review before it is sent to the user.
Every request flow (except for copy and summary of data requests) completes its processing in this stage. However, the summary of data and copy requests has an additional stage to be configured in the request flow.
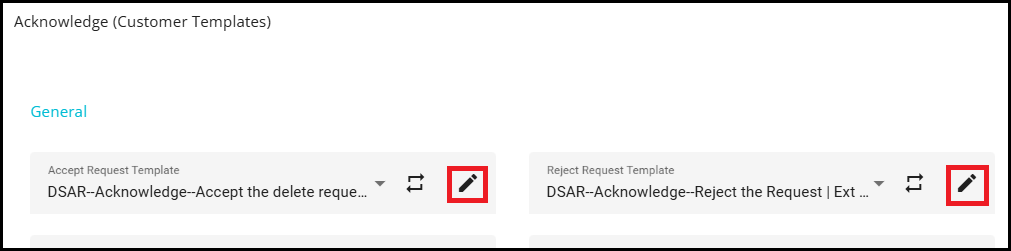
To configure any of the email templates related to different phases---such as General, Verification, New, and others---click on the pencil icon next to the template name. This action will navigate you to the Configure Email screen, where you can edit the content of the selected email template to suit your requirements.
For detailed steps on configuring an email, please refer to configure email.docx.
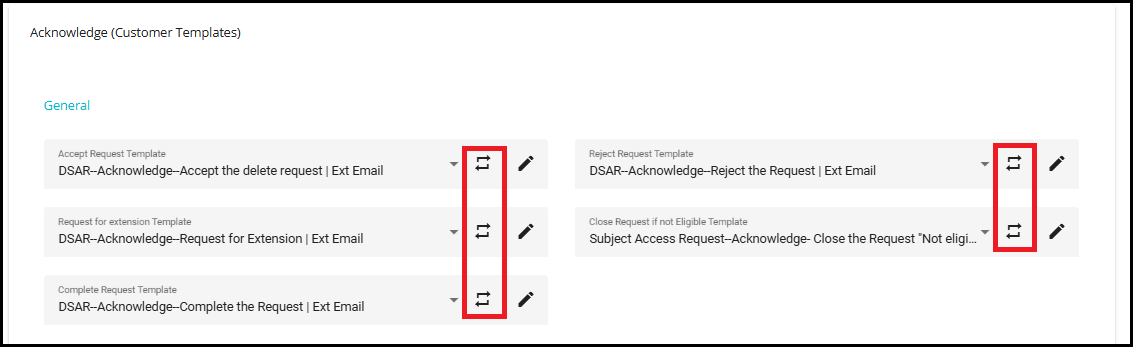
Template Override
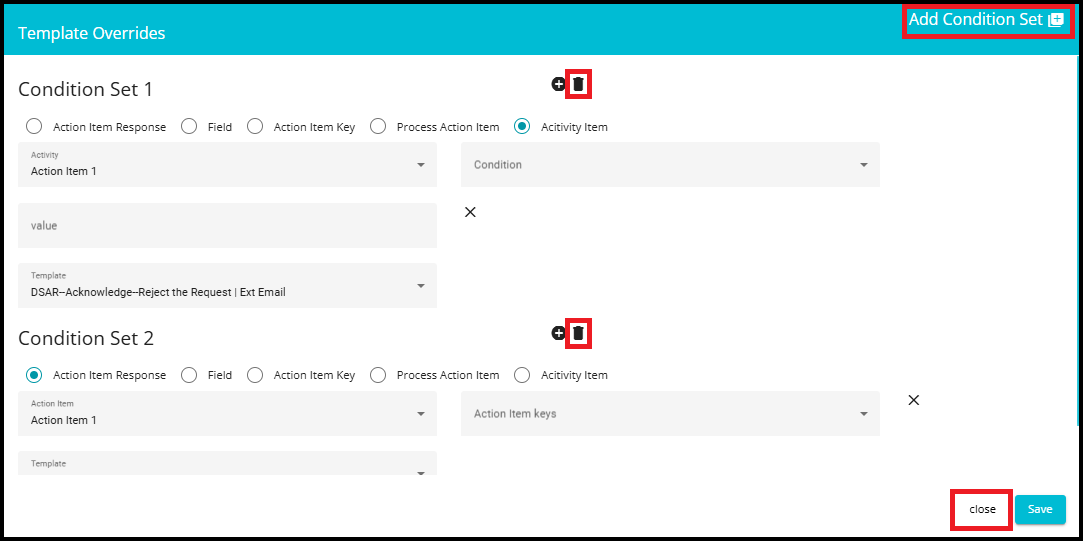
Template overrides allow you to replace the default email template for a particular scenario with another template, based on specific conditions you define. This is useful when you want to send a different email for certain cases without changing the default template for all situations.
To add conditions for template overrides, click on the template override icon
 next to the template name. This allows you to set up custom rules and conditions for when a particular template should be used, based on user responses or other criteria.
You can see a pop-up on the screen, where you can customize the templates based on the responses from the user.
Click on 'Add Condition Set +'.
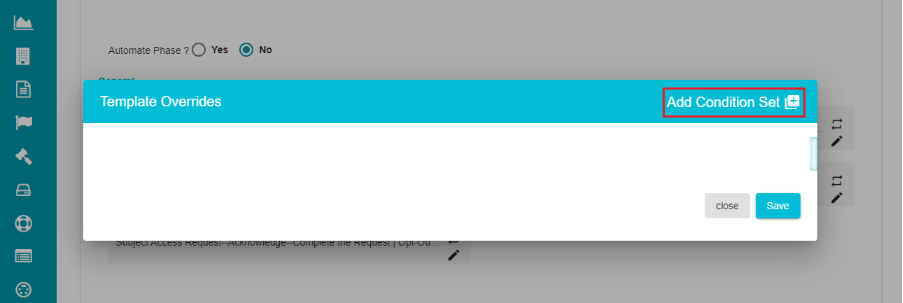
You can add conditions for template override in five ways:
Based on Action Item Response
Based on Field
Based on Action Item Keys
Based on Process Action Item
Based on Activity Item
This flexibility allows you to tailor email templates for different scenarios and conditions within the DSAR workflow, ensuring that communication is relevant and specific to the context of each request.
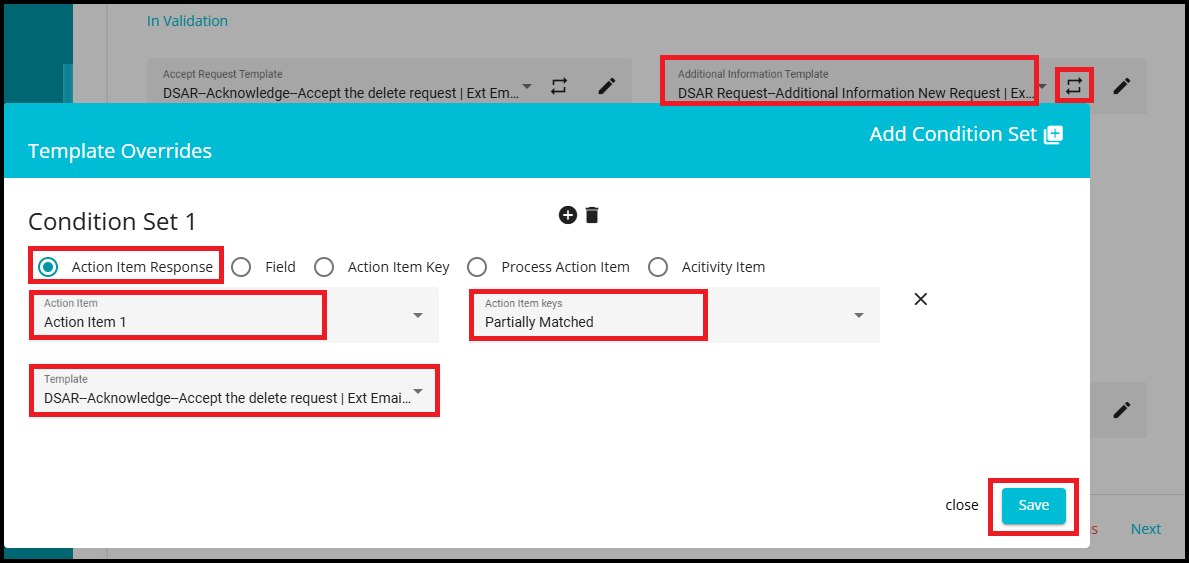
Action Item Response
Action item response conditions allow you to send specific email templates based on the response status of a particular action item in the request. We use the Action Item Response option when we want to tailor email communications according to how an action item was answered or processed.
Select the Action Item Response radio button.
From the Action Item dropdown, select the relevant action item (e.g., "Action Item 1").
In the Action Item Keys dropdown, choose the response status that should trigger the template (e.g., "Partially Matched").
From the Template dropdown, select the email template you want to send when this condition is met.
Click the Save button to save your condition set.
Example:
Consider that you normally send the "Need Additional Info" email when there is a partial match in the validation phase. But if "Action Item1" is "Partially Matched, you want to send the Accept Request email instead.
To do this, click on the override symbol next to the Need additional information email template and add a condition. This way, the system will send the Accept Request email template whenever the specified action item response is "Partially Matched," providing flexibility in your workflow.
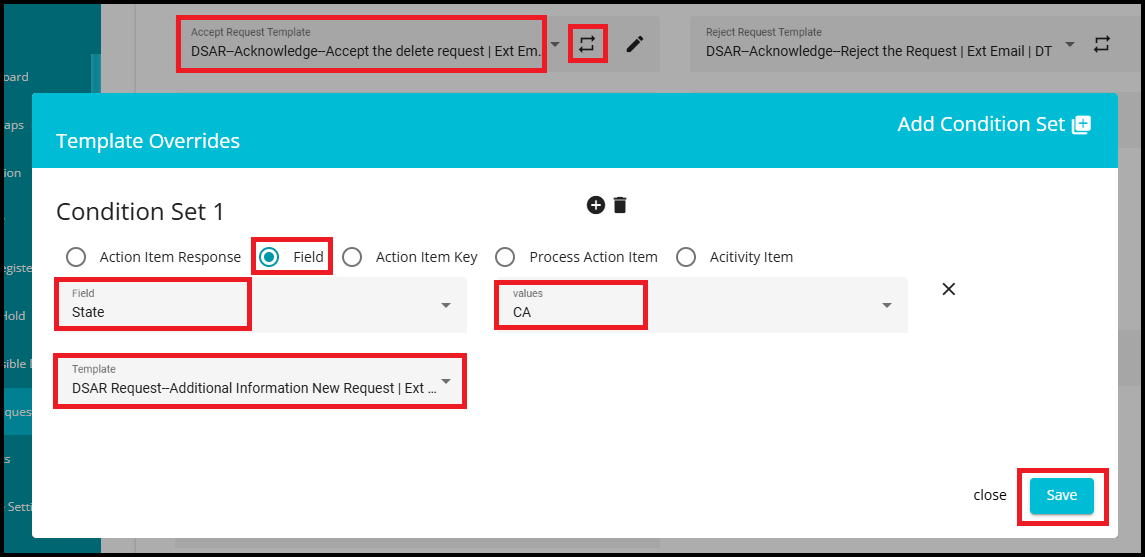
Field
Field conditions allow you to send specific email templates based on the value of a particular field in the request.
Choose the Field radio button as the condition type.
From the Field dropdown, select the relevant field (e.g.,"State").
From the Values dropdown, select the value that should trigger the template (e.g., "AK").
From the Template dropdown, select the email template you want to send when this condition is met.
Click the Save button to save your condition set.
Example: Suppose you normally send the Accept Request email for all state values. But if the state value is "CA," you want to send a Need Additional Info email instead. To do this, you click on the override symbol next to the Accept Request email template and add a condition:
If State = CA, select the Need Additional Info template. Now, for requests where the state is "CA," the system will send the Need Additional Info email instead of the Accept Request email.
- Note: The values in this menu vary based on the chosen field from the Field drop-down menu.
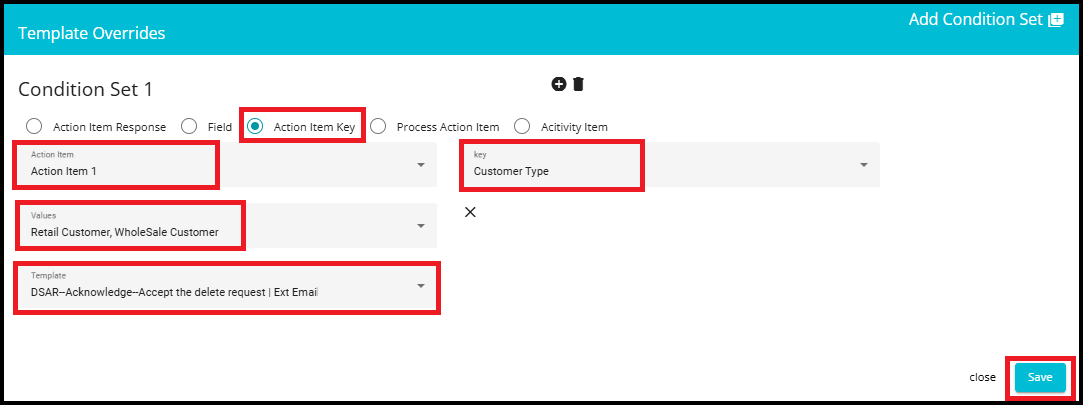
Action Item Key
The Action Item Key option is useful when a request is in the Validation phase. It provides more granular control over template overrides by letting you choose which email template to send based on specific key--value pairs within an action item.
Choose the Action Item Key radio button as the condition type.
From the Action Item dropdown, select the relevant action item (e.g., "Action Item 1").
In the Key dropdown, select the key you want to use (e.g., "Customer Type").
From the Values dropdown, select the value that should trigger the template (e.g., "Retail Customer, Wholesale Customer").
From the Template dropdown, select the email template you want to send when this condition is met.
Click the Save button to save your condition set.
Example
Let us consider a scenario: You send an additional info template in the validation phase if the action item key has the value "Retail Customer". However, if the action item key contains both "Retail Customer" and "Wholesale Customer," you want to send the "Accept Request" email instead. By setting up a condition for the action item key, you ensure that the correct template is sent for complex scenarios, making your workflow more flexible and responsive to different request details.
Both Process Action Item and Activity Item are used to configure template overrides when a request is in the In Process phase. The key difference is who the action item is sent to.
Process Action Item (Systems / Internal Action Items)
Used for action items created for systems.
These action items are sent only to users who are registered in the Data Governance Tool (DGT) (internal users).
Activity Item (External Action Items)
Used when you need to send action items to external users who are not registered in DGT.
Enable the Enable Activity checkbox to create activity action items, which can be directed to individuals outside of DGT.
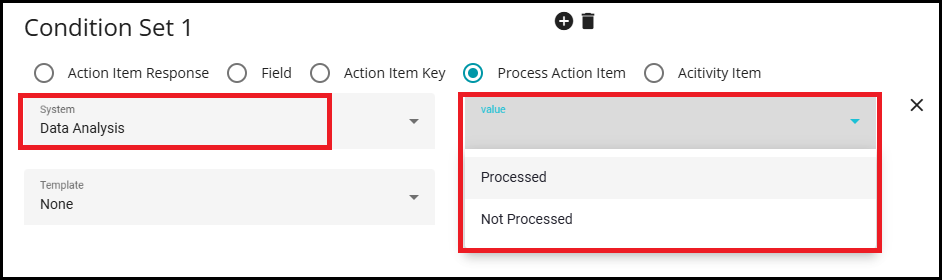
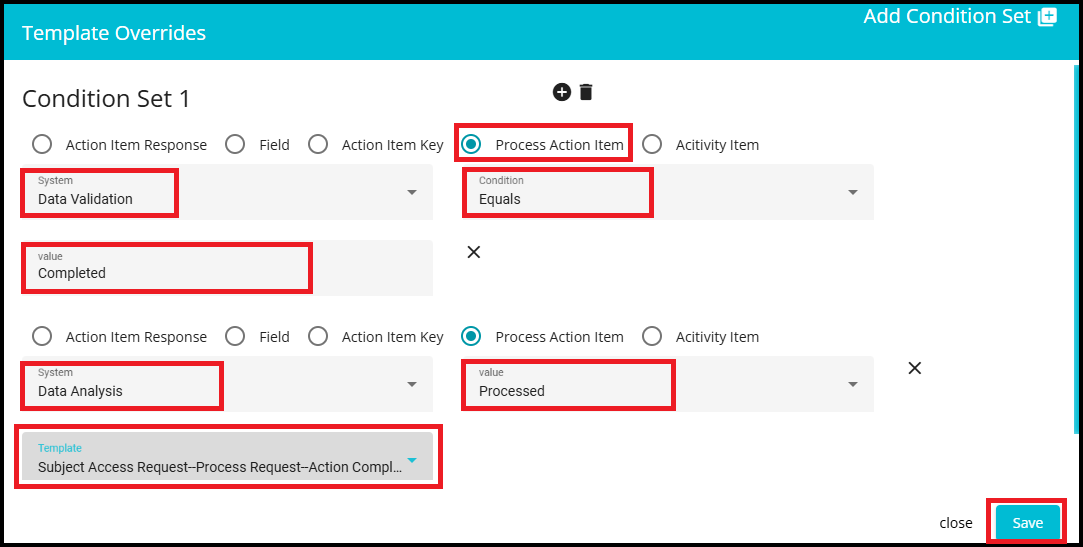
Process Action Item
In the Template Overrides window, choose the Process Action Item radio button.
From the dropdown menu labeled "System," select the system for which you want to configure the override (for example, "Data Analysis or validation").
Based on the response configuration defined for the selected system in the In Process stage, the Condition and Value fields appear as follows:
- If the configured response type is Text, both Condition and Value fields appear, and you must manually enter the value.
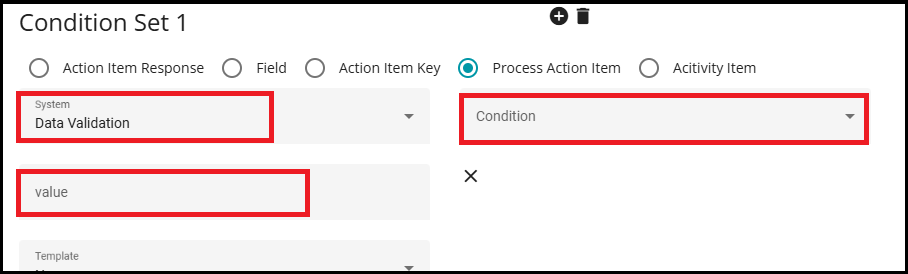
- If the configured response type is a Radio button or Checkbox, only the Value field appears as a dropdown. The dropdown lists the options configured in the Response tab of the In Process phase.
Example
Assume your workflow has multiple systems (for example, Data Validation, Data Analysis, and Accord), and you want to mark the request as successfully processed only when the required systems meet the completion criteria. If the criteria are not met, the default behavior is to send the Need Additional Info email.
For instance, instead of sending the Need Additional Info template, you want to send an Action Item Completed / Complete Request template only when both Data Validation and Data Analysis meet the criteria.
To do this, click on the override symbol next to the Need additional information email template in the In Process stage and add a condition.
From the Template dropdown, select the email template you want to send when this condition is met.
Click the Save button to apply your configuration.
This way, the system will send the completed template when both selected systems meet the criteria; otherwise, the default Need Additional Info handling continues.
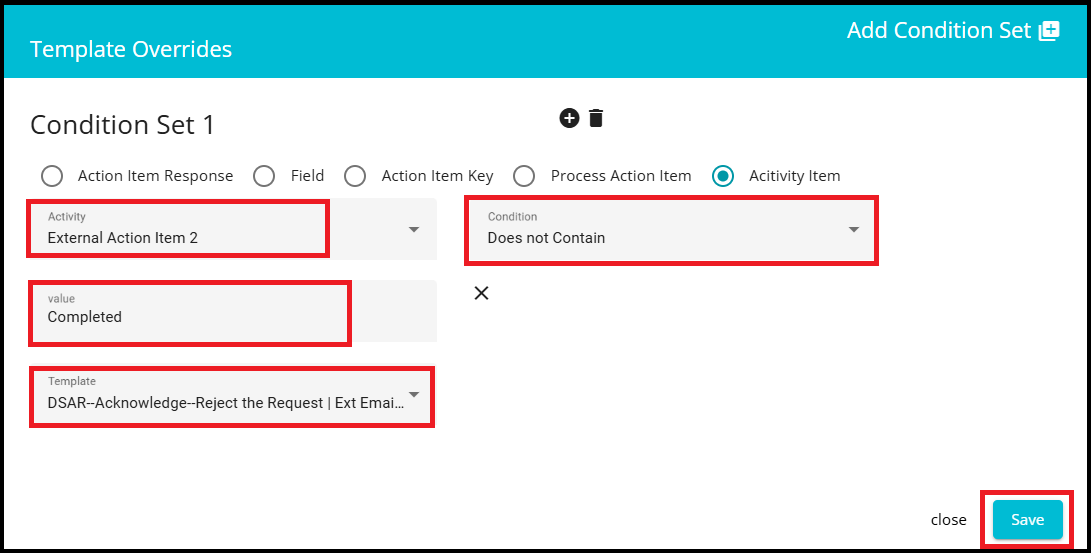
Activity Item:
In the Template Overrides window, choose the Activity Item radio button.
From the Activity dropdown, select the relevant activity.
Based on the response configuration defined for the selected activity in the In Process stage, the Condition and Value fields appear as follows:
- If the configured response type is a Radio button or Checkbox, only the Value field is displayed as a dropdown. The dropdown lists the options configured in the Response tab of the In Process phase.
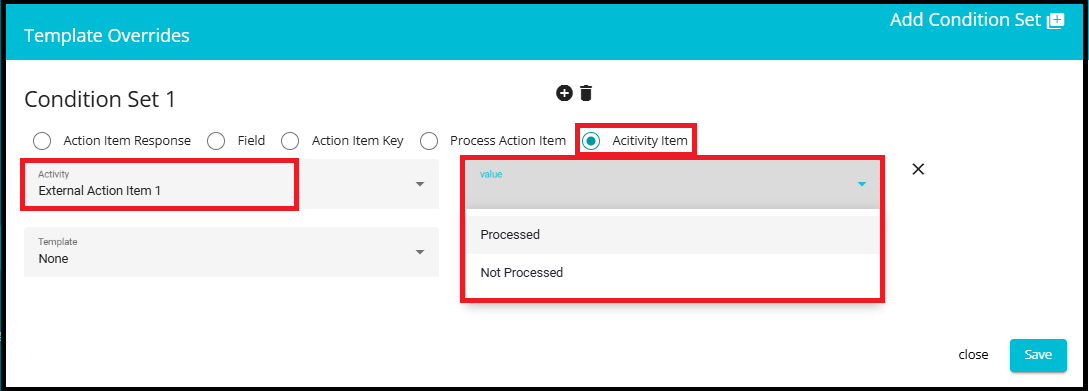
- If the configured response type is Text, both Condition and Value fields are displayed, and you must manually enter the value.
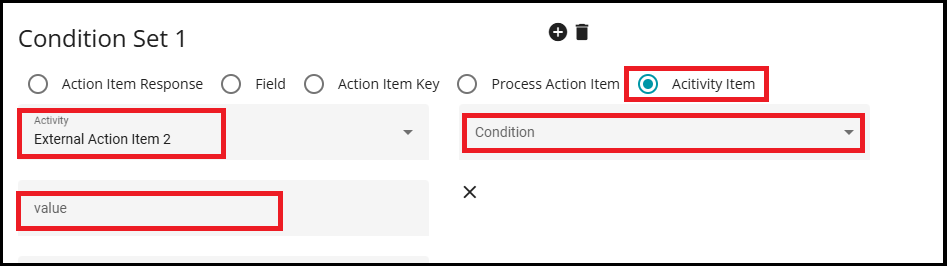
Example
Suppose you generally send a "Need Additional Info" email if any Action Item does not contain the value Completed in the process phase. However, you want to send a "Reject Request" email template specifically when External Action Item 2 does not contain "Completed."
To do this, click on the override symbol next to the Need additional information email template in the In Process stage and add a condition.
From the Template dropdown, select the email template you want to send when this condition is met.
Click the Save button to apply your configuration.
Use the '+' icon to define multiple configurations for each event. This allows you to add additional condition sets or rules as needed.
To delete a configuration, simply click on the 'X' symbol next to the specific configuration you want to remove.
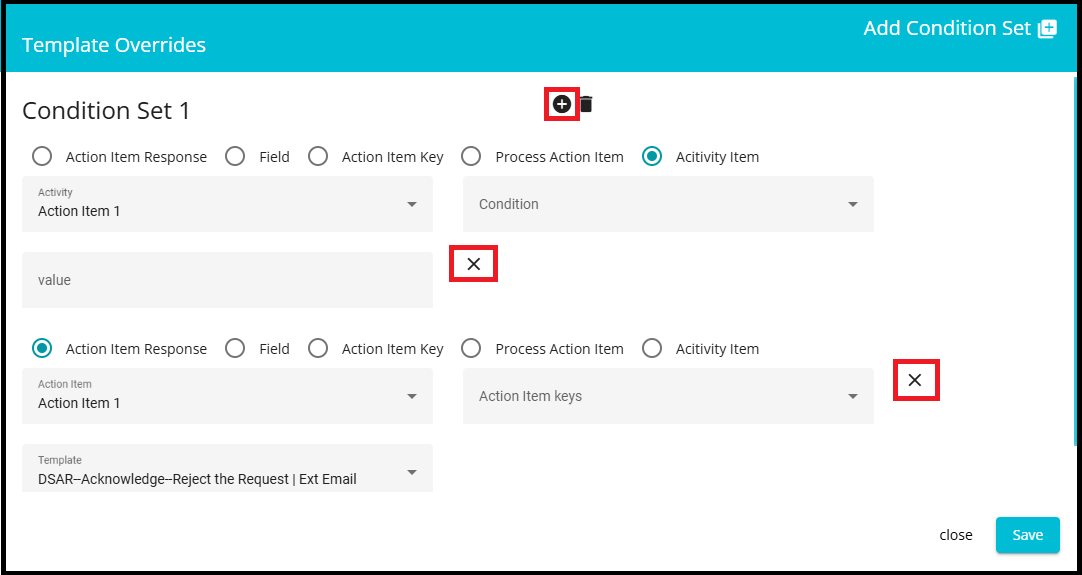
You can add multiple conditions for template overrides by clicking on the Add Condition Set (+) button at the top right of the Template Overrides screen. Each condition set allows you to define a unique scenario for sending a specific email template.
To delete a condition, simply click on the bin icon (trash can symbol) next to the condition set you want to remove. This makes it easy to manage and update your template override rules.
If you want to return to the main Acknowledge screen, click on the Close button at the bottom right.